There are different ways you can customize your Android device to match your preferences. One of the ways to do that is through the System UI Tuner menu on your Android device. The System UI Tuner lets you modify some settings in your device like displaying the battery indicator on the status bar or the icon that indicates the battery percentage of your device. Before we proceed though, take note that the System UI Tuner menu may not be available on some devices. We have tried it on different devices like Samsung tablet, LG phone and Google tablet but were only able to access the System UI Tuner menu in the Google tablet. So be sure to check you device first, to do so, follow the first few steps below.
How to enable the System UI Tuner menu:
Step 1: Swipe or drag down from the top of your screen to open Settings (the gear icon). And then hold your finger down on the Settings icon until it starts spinning which only takes 5-7 seconds.

Take note that it can be difficult to tell when the gear icon starts spinning since you’re holding it, so it’s best if you use a stylus to make it easier for you to see when it starts spinning.
Step 2: Once the gear icon starts to spin, lift your finger. After that, the Settings will be automatically opened and then a message will be displayed stating that, “Congrats! System UI Tuner has been added to Settings”.

Step 3: Another indication that the System UI Tuner is added is the small wrench icon besides the gear icon for Settings. Tap Settings (the gear icon) to go to the System UI Tuner menu.

Step 4: After opening Settings, look for System UI Tuner which is usually under the Developer options and About. Tap on the System UI Tuner.

Step 5: After tapping System UI Tuner, a dialog box will pop-up that will warn you about how these features can affect your Android device since it may change, break or disappear in future Android releases. To continue, tap on Got it.

Step 6: Once you’ve opened the System UI Tuner menu, it will display three options; the Status bar, Do not disturb and Other. Tap on the Status bar option.

Modifying the Status bar settings under System UI Tuner
Step 1: Another set of settings will be displayed once you’ve opened the Status bar option. So if there are some settings you don’t like or use, you can turn them off. To do that, just drag the slider button to the left that will turn the setting to gray, an indication that it’s already disabled while the enabled ones have blue slider buttons.

Step 2: Under the System UI Tuner menu, select the Battery option. This is one of the useful options that let you hide the battery icon if you like to or display it with or without the battery percentage. As you can see, the default setting for the battery percentage is Show percentage when charging.

Step 3: So if you want to display the battery percentage all the time even if it’s not charging, you can select the Always show percentage option.

Modifying the Do Not Disturb setting under System UI Tuner
Step 1: After adjusting the Status bar setting to your preference, tap the back button to go back to the System UI Tuner main menu and then tap Do not disturb.
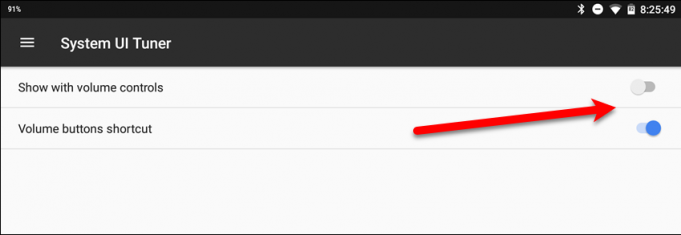
Step 2: After opening the Do not disturb option, turn on the Show volume controls slider button so that when you use the volume controls, it’ll also show the Do not disturb slider button. Through the Volume buttons shortcut, it will allow you to turn on Do not disturb by turning the volume all the way down.
Modifying the Power Notification controls on the Tuner Menu
Step 1: Tap the back button to go back to the System UI Tuner main menu and then tap Other, after that tap Power notification controls.
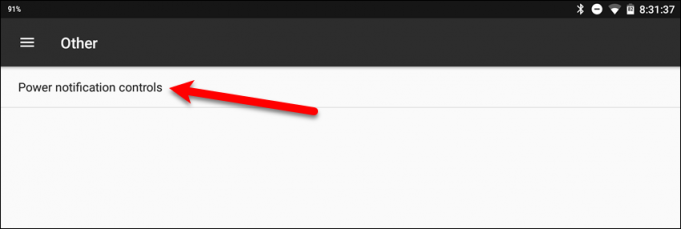
There are several options in Android that lets you adjust notifications for each of your installed applications. You have the option to block all the notifications for each application, or silence all the notification for each application or to prioritize the notifications for all applications to override the Do not disturb mode. To access this feature you have to enable the Power notifications controls.
Step 2: Tap the Power notifications controls and then drag the slider button to the right to enable it.

Using the Power notification controls, you can set an importance level, as you can see on the illustration above, from 0 to 5 for an application’s notifications.
Disabling the System UI Tuner menu
If you don’t want the complexities of the System UI Tuner, you can always disable it anytime you like. You can disable it either through Settings or from the Home screen.
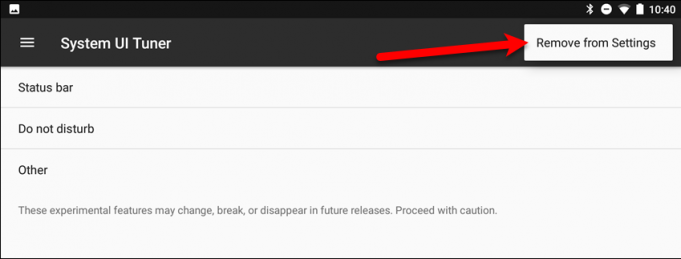
Step 1: Open Settings and go to the System UI Tuner menu. And then tap the three vertical dots icon located at the upper right corner of your screen.
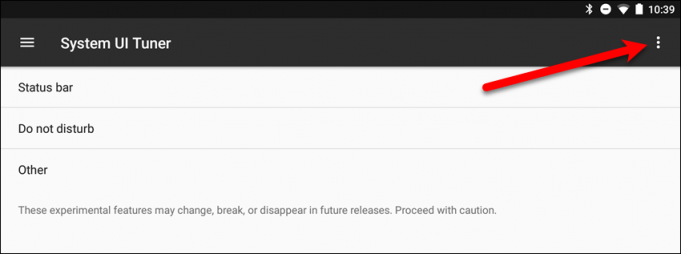
Step 2: After tapping the three vertical dots icon, a button will be displayed labeled as Remove from Settings. Tap the button to remove System UI Tuner from settings.
Step 3: To remove the System UI Tuner menu from your home screen, drag or swipe down from the top of your screen and press and hold the gear icon for Settings until it spins.
Step 4: After tapping the button and after the gear icon spins, a dialog box will pop-up to confirm the removal of the System UI Tuner menu. If you really want to remove it, tap Remove.

