Files are piled up in our mobile devices, and it’s increasing in time. Some data are private and we keep it private as it is as much as we could. We use methods to primarily protect those data especially the private ones. But what if there are some instances, when someone has to use our mobile device for some reasons, and we have to let them use it? One way to protect your valuable data is through adding new user account to your android mobile device.
Either on Windows or Mac computer, you can definitely add multiple user accounts. In that way, it keeps all the data and the applications separate for each account. So, when someone uses your computer, you can provide them a different user account or guest account to keep them out of your personal account. Basically, you can do the same thing on your Android device.
Go to the User Panel
Initially, you have to find and open the “User” panel, which you will be doing often to add, switch, and delete users.
The process for opening the “User” panel may vary depending on the brand of Android device you’re using. On a Google Pixel device for instance, just swipe down twice from the top of its screen and then tap the blue user icon.
NOTE: It has been tested on a Google device and a Samsung device. However, the ability to add user accounts does not seem to be available for LG devices.
![]()
On the Samsung device, just swipe down once and tap the yellow user icon.
![]()
Once you tap the icon, the “User” panel displays. You will then see the icons for your account, the “Add guest” icon , and the “Add user” icon.
You can add a new user from this panel by just tapping “Add user“, it will then open the account for new user. However, you can also add a user through the “Settings” app. More so, there are also additional options available in the “Settings” app, it varies on the brand of your device.
We are going to add a new user account from within the “Settings” app, so tap “More Settings” on the “User” panel. The “More Settings” button may be of different title on your device.
For instance, it’s “Details” on a Samsung device. It will have another name on the Google tablet, so we will refer to this button as “More Settings“.

Adding a New User Account Without Restrictions
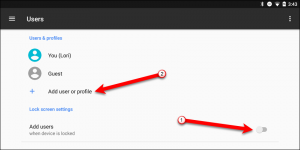
The “Users” screen in the “Settings” app is just pretty similar to the “User” panel on the Home screen. You will see your account and the Guest account listed there, and an option to “Add user or profile“. The latter option will allow you to add a new user account without restrictions or a profile with restricted access.
On a Google device, you will also see an option that allows you to add users even the device is locked. Take not that this option is not available on Samsung devices.
To add a new user account without restrictions, simply tap the “Add user or profile” option on the “Users” screen. But if you are using a phone, the option will only be “Add user“.

Tap “User“ on the “Add” dialog box.
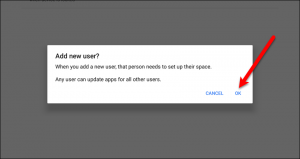
A confirmation dialog box will then displays which tells you that the user will need to set up their space. Simply tap “OK” to continue.

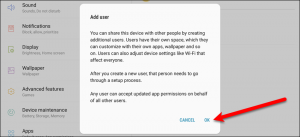
It would be different on the Samsung device, because you get a bit more explanation.

Then, you will be asked if you want to set up the user now. Simply tap “Set Up Now“.
Setting Up a New User Account
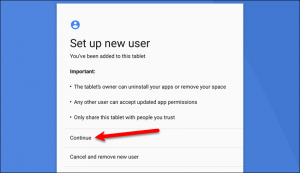
The process of setting up a new user is similar to when you set up a new device. The user can sign in to their Google account and have access to the data from their account. However, they won’t have access to any of your data or apps.
Tap “Continue” and then either you or the person who will use the account can follow the on-screen instructions to finish setting it up.

After you’ve gone through all the steps to set up the account, the Home screen for the new account displays. The user can access all the default apps that are installed on the certain type of device that are usually used.
Apps can be installed from the Play Store as long as the user logged into their Google account during entire process and setup.
